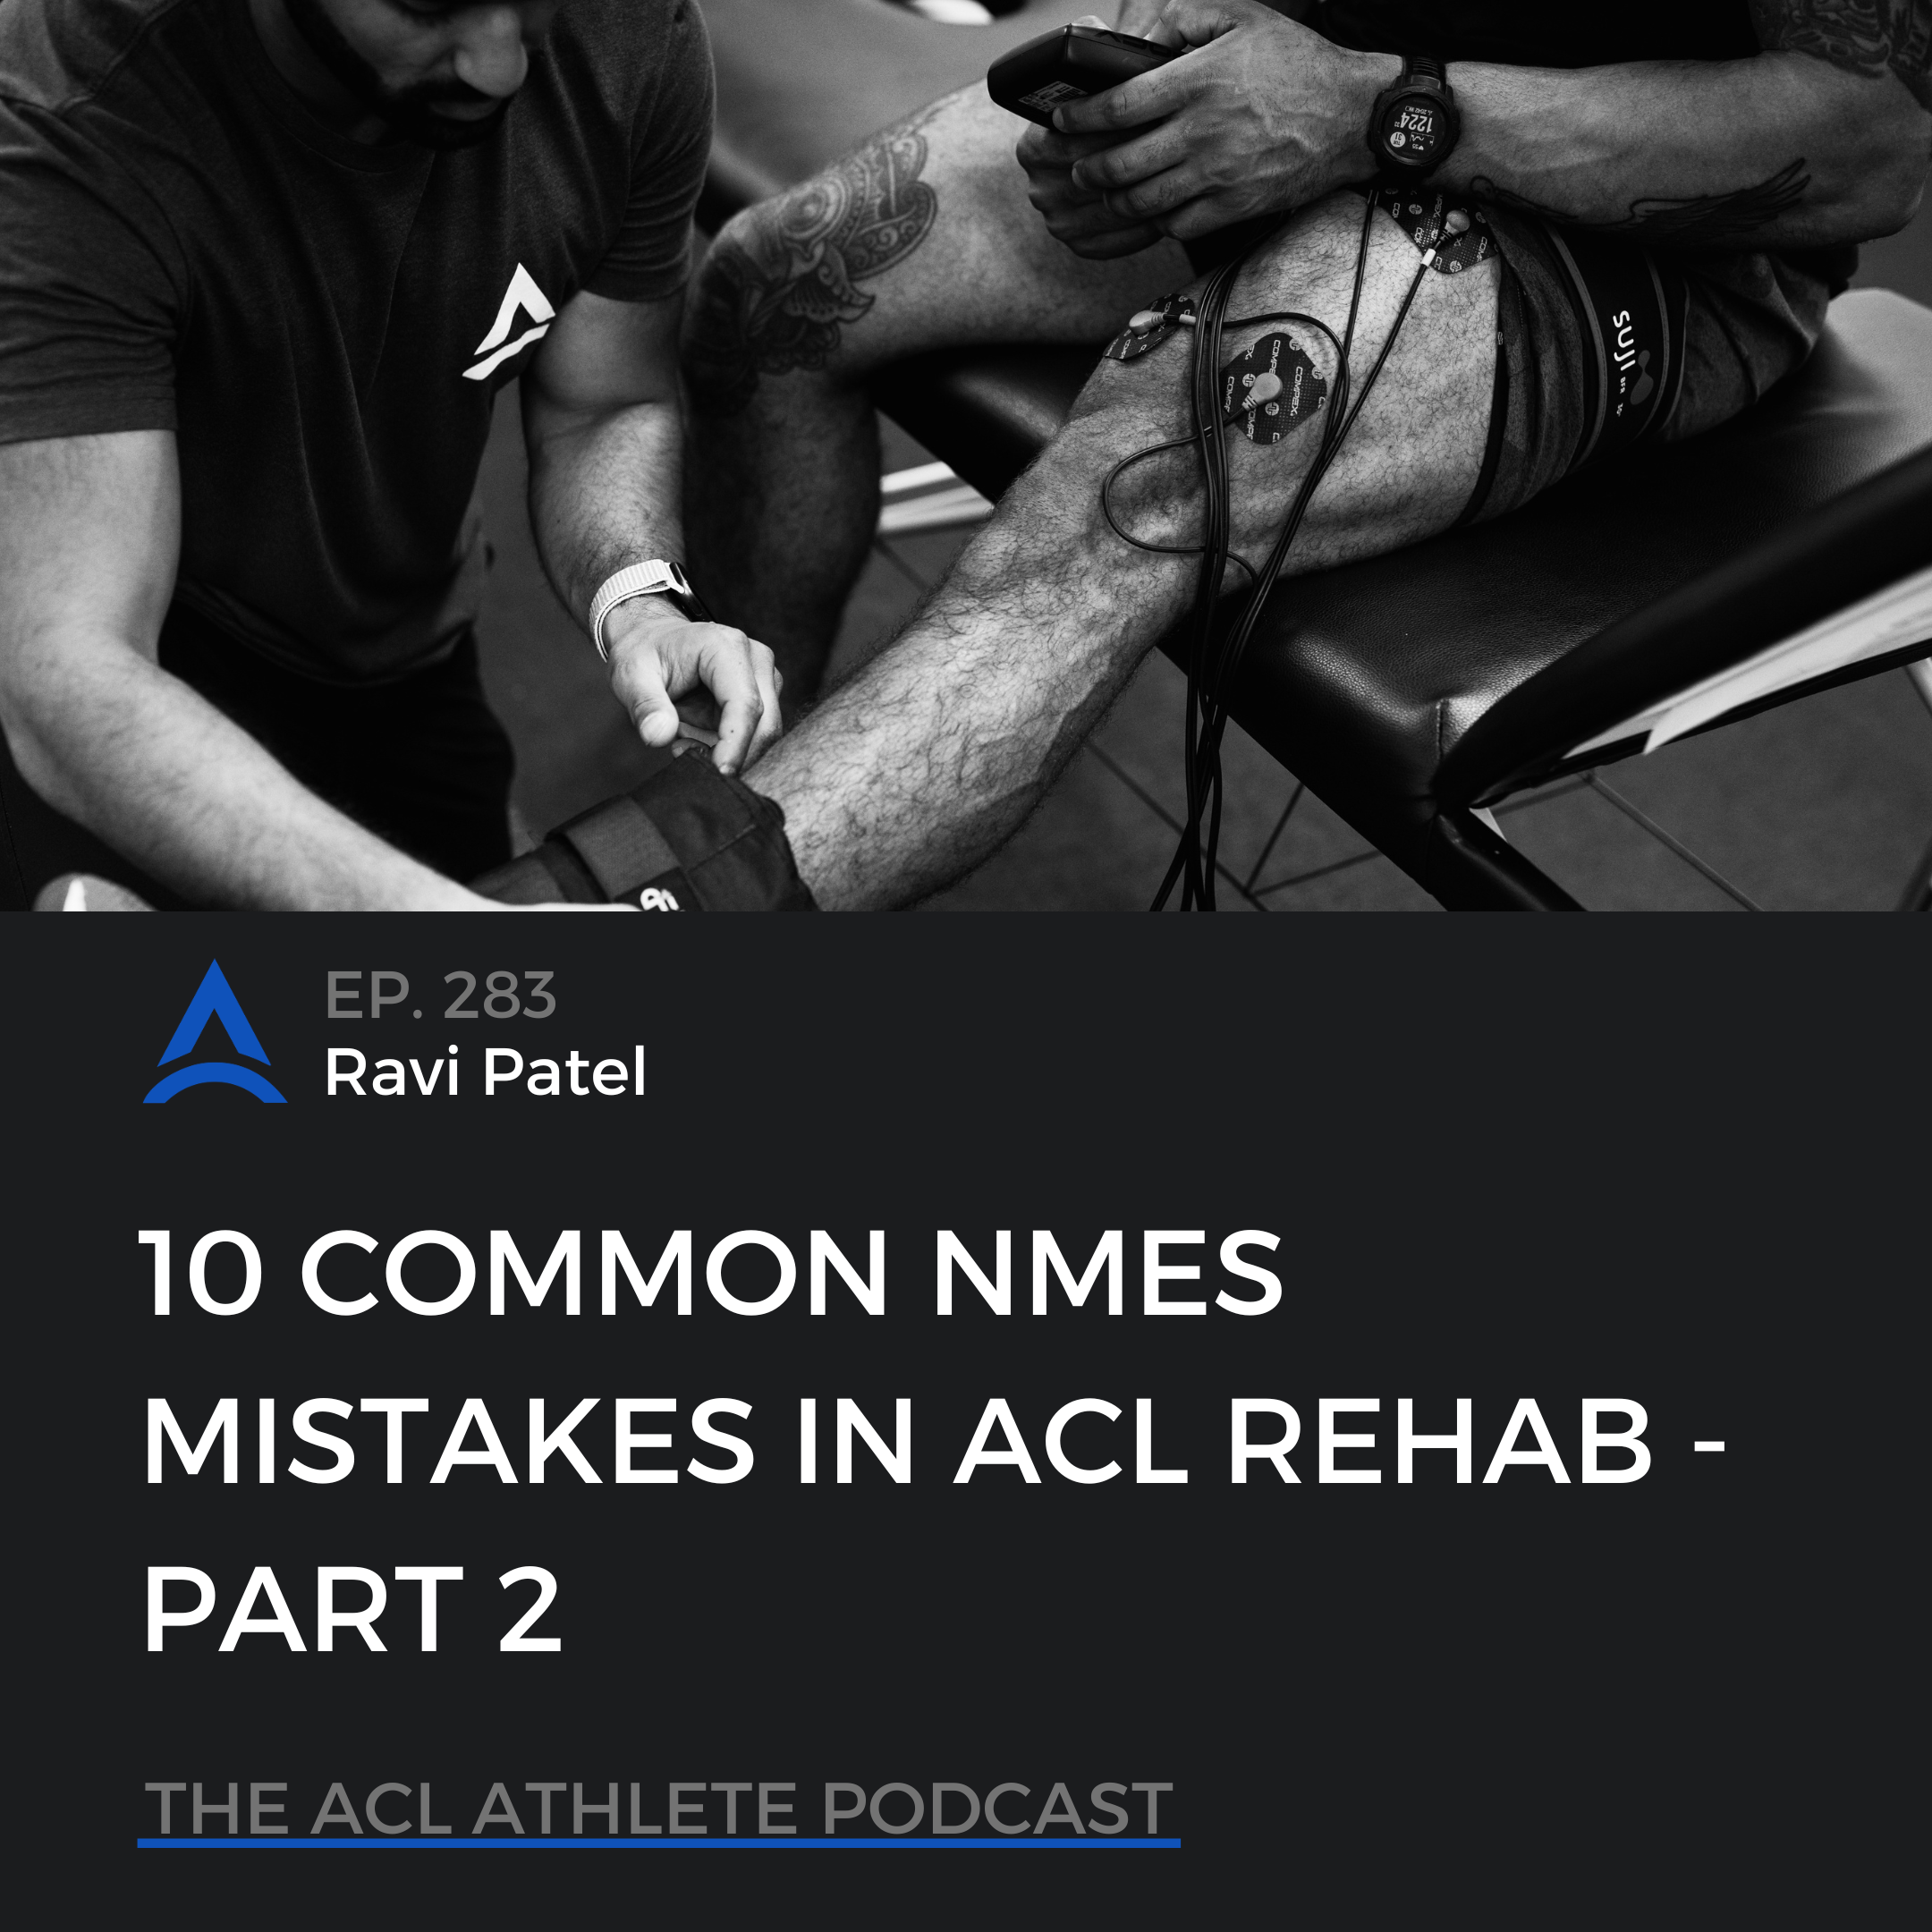
Show Notes:
In this episode, we kick off a two-part series on one of the most valuable tools in ACL rehab: neuromuscular electrical stimulation, or NMES. We break down why arthrogenic muscle inhibition makes quad recovery so much harder than most athletes expect, why stopping NMES the moment the quad starts firing is one of the most common and costly mistakes we see, and how a simple shift in frequency and intensity can produce up to seven times more stimulus than a standard in-person PT session alone. We also cover the difference between a TENS unit and an NMES unit, what max tolerable intensity actually means in practice, and when to reintroduce NMES if quad strength has plateaued deep into recovery. Whether you are an ACL athlete, a clinician, a parent supporting someone through this process, or a coach working with post-op athletes, this episode gives you the knowledge to ask better questions and get more out of every session.
NMES Device:
Motor Points for the Quads
- Motor point heatmap guide for neuromuscular electrical stimulation of the quadriceps muscle
- Muscle motor point identification is essential for optimizing neuromuscular electrical stimulation use
NMES Research
- Neuromuscular electrical stimulation is effective in strengthening the quadriceps muscle after anterior cruciate ligament surgery – Hauger 2018
- Effects of Neuromuscular Electrical Stimulation After Anterior Cruciate Ligament Reconstruction on Quadriceps Strength, Function, and Patient-Oriented Outcomes : A Systematic Review – Kim 2010
- Utility of Neuromuscular Electrical Stimulation to Preserve Quadriceps Muscle Fiber Size and Contractility After Anterior Cruciate Ligament Injuries and Reconstruction: A Randomized, Sham-Controlled, Blinded Trial – Toth 2020
- Can the Use of Neuromuscular Electrical Stimulation Be Improved to Optimize Quadriceps Strengthening? – Glaviano 2015
- Who’s Afraid of Electrical Stimulation? Let’s Revisit the Application of NMES at the Knee – Arhos 2024
What is up everyone? Today, we are diving into part two of the NMES series. If you have not listened to part one yet, go back and start there. We covered the big-picture mistakes that we commonly see in this process using NMES, whether you’re actually using it, when you’re using it, how often, and at what intensity. These are very foundational to this process. And today is going to build on top of that.
Part two today is about what happens inside each of these sessions, the setup, execution, and the details that most people either do not necessarily know about or do not think matter as much. There are nuances here that we can get a lot out of, and these details really matter. Just like with any other thing that we are doing in this process, the details are important.
We are closing out with a rapid-fire parameters block that I will share at the end, to give you some technical specifics so you can get a little bit more out of it. But the same framing as last week applies here. These mistakes are not going to apply to every single person. There could be legitimate reasons your setup looks different, whether you are in your recovery or what your PT has prescribed.
The goal is not to overwhelm you or have you run off trying to fix everything at once or thinking you need NMES in general. I always want to provide the information so you can understand it and then use it to ask better questions, especially if things do not feel like they are adding up, or if you think there may be a blind spot or something you and your physical therapist have not considered that could get a bit more out of your rehab.
It does not mean you need to apply all 10 things I share here. It might be one thing; it might be two things. The goal is simply to make sure you are not blindly going through rehab thinking everything is being done correctly, especially later in the process when NMES is not being used anymore. It is always context-dependent.
As I shared with our athletes, there are many who are not necessarily using this in their rehab, even in the early post-op stages. That said, if you’re post-op and you’re one of our athletes, there is a very rare chance you’re not using this. Otherwise, NMES is generally recommended early and often post-op, though we adjust duration and usage as you progress.
Let’s dive into the second half of these common mistakes. I will start with number six since we covered one through five in part one.
Mistake number six is rushing through what we call the duty cycle. The duty cycle is the ratio of on-time to off-time during an NMES session. Most research supports roughly a one-to-five ratio, something like 10 to 15 seconds on, followed by about 50-ish seconds of rest. Sometimes you will see slight variations, but that general structure holds across NMES literature for quadriceps, especially in ACL rehab.
What we often see is athletes shortening the rest period, maybe doing 10 seconds on and 20 seconds off, because it feels faster or more efficient. The thinking is usually, “If I can get through this quicker or fit more contractions into less time, I am saving time.” But that logic breaks down in practice.
NMES preferentially targets fast-twitch muscle fibers, which fatigue quickly, and you are applying this to a quadriceps that is already inhibited post-op or post-injury. You are not dealing with a fully functioning muscle. You are dealing with arthrogenic muscle inhibition layered on top of post-surgical weakness.
So NMES is not a HIIT workout. It is not about cramming in as many contractions as possible. It is about the quality of contraction. Think of it like a one-rep max. You would not cut rest time short between heavy lifts and expect the same output. The same principle applies here. Each contraction needs full recovery so the next one can be maximal.
A strong contraction only happens when the muscle has had adequate rest. So keep that ratio around one-to-five, roughly 10 to 15 seconds of contraction followed by about 50-ish seconds of rest. Turn the intensity up as high as you can tolerate during that contraction, squeeze maximally, and then fully let it recover.
There are exceptions. If time is limited, you can adjust the rest period to fit the constraints of your day. But if you have the time, it is better to stay with the full structure and maximize output per contraction.
Mistake number seven is incorrect pad placement. This has a major impact on both effectiveness and comfort and is one of the most overlooked parts of setup. A common issue is placing pads randomly over the quadriceps without targeting motor points.
Motor points are the locations where motor nerves enter the muscle tissue. At these points, less current is needed to produce a strong contraction. When pads are placed correctly, you get stronger contractions at lower intensity and less discomfort overall.
The typical setup is one pad over the vastus medialis oblique (VMO), the teardrop-shaped portion of the inner quad near the knee, and another pad placed high on the vastus lateralis near the outer upper thigh. Care needs to be taken not to drift too high into the tensor fasciae latae (TFL), which is a hip flexor and not part of the quadriceps.
When placed correctly, the pattern is essentially diagonal across the quadriceps from the inner knee area up toward the outer thigh. This setup increases muscle coverage, improves motor point targeting, and enhances overall contraction quality.
The key here is intentionality. This is not a random placement. It directly affects how much of the quadriceps you are actually recruiting and how effective the session is.
Mistake number eight is using pads that are too small. Many athletes default to small two-by-two electrode pads because that is what comes with most NMES units. These can work, but they are not ideal for large muscle groups like the quadriceps.
Smaller pads concentrate current into a small area, which increases discomfort and limits muscle coverage. Larger pads, such as two-by-four or four-by-four sizes, distribute current more evenly across the muscle, allowing for better recruitment and a more tolerable experience.
With larger pads, more muscle fibers are exposed to the stimulus, increasing overall contraction quality while reducing localized irritation. The sensation becomes less sharp and more evenly distributed, which allows you to tolerate higher intensities.
In practice, most people will do well with at least a two-by-four or four-by-four pad. For larger quadriceps, even larger formats like three-by-five or four-by-eight can be useful. The key is matching pad size to muscle surface area so you can maximize both comfort and output.
Mistake number nine is poor skin contact and not changing pads regularly. This includes using worn-out pads, applying them over lotion, or placing them over excessive hair, all of which reduce conductivity and consistency of the current.
When contact is poor, the electrical current becomes inconsistent and contraction quality drops significantly. You may still feel something happening, but you are not getting the full therapeutic effect. In many cases, athletes are only getting a fraction of their potential output.
Before applying pads, make sure the skin is clean and dry. Remove lotion or oils, and if necessary, clean the area with alcohol wipes. Excess hair should be trimmed if it interferes with adhesion. The goal is consistent, full-surface contact.
Pads also degrade over time. As the adhesive weakens, contact becomes patchy, and the quality of stimulation drops. Many athletes do not realize this because the decline is gradual, and they adapt to the weaker sensation.
Fresh pads with strong adhesion are essential. If the pads are no longer sticking well, they should be replaced. This is one of the simplest but most impactful variables in NMES effectiveness.
Mistake number ten is weak or dying batteries. Battery-powered NMES units gradually lose output as charge declines. The issue is that this decline is subtle, so athletes often do not notice it and assume the weaker contractions are normal.
Over time, you adapt to a lower stimulus without realizing it, which means you are consistently underdosing the muscle. The session may look correct on the surface, but the physiological output is significantly reduced.
If your device uses batteries, replace them regularly. If it is rechargeable, ensure it is fully charged before every session. This ensures consistent output and prevents a gradual performance drop-off.
Now, parameters you should know, rapid fire. Pulse duration should be at least 400 microseconds. Research, including work by Glaviano and Saliba, suggests that 400 to 600 microseconds is optimal for maximizing torque production and motor unit recruitment while minimizing fatigue. If your device allows adjustment, aim toward the higher end of the range.
Pulse frequency should be between 30 and 50 hertz. In most ACL rehab contexts, we aim closer to 50 hertz. Lower frequencies may not produce strong contractions, while higher frequencies can increase discomfort and reduce tolerance over time.
Another variable is contraction rate. This is something we intentionally vary in programming. Some contractions are slow and controlled, while others are more rapid and explosive. This variation may influence motor unit recruitment patterns, rate coding, and reflex responses.
There is also ongoing discussion around voluntary versus involuntary contraction. Some clinicians suggest avoiding voluntary contraction during NMES, while others routinely pair both together. There is no definitive consensus.
In practice, many clinicians use active contraction alongside NMES. Others will also use passive contractions where the device does all the work. Both may have value depending on the goal and stage of rehab.
We often pair NMES with isometric holds, such as terminal knee extension positions or fixed-angle holds at around 60 to 90 degrees of knee flexion. This leverages optimal length-tension positioning of the quadriceps for maximal force output.
The strongest quadriceps output occurs in mid-range knee flexion, not full extension or deep flexion. This is similar to how a bicep produces peak force around 90 degrees of elbow flexion. Combining NMES with these positions can significantly enhance recruitment and torque production.
Across both parts of this series, we covered 10 common mistakes: improper timing and usage patterns, using the wrong device type, underuse, insufficient intensity, failure to use NMES during plateau phases, rushing duty cycles, incorrect pad placement, undersized pads, poor skin contact or outdated pads, and weak batteries.
NMES remains one of the most cost-effective and evidence-supported tools in post-operative knee rehabilitation, yet it is still underutilized or poorly executed in many settings. The goal of this series is to help tighten those details so you can get more out of every session.
If you are not using NMES at all, especially early post-op, it is worth discussing with your clinician. If you are already using it, go back through these points and identify one or two adjustments that could improve your setup.
I will say it again because I mean it. I think that NMES should be the standard for postoperative knee cases. It is cost-effective, the research behind it is strong, and it is still being underused across the board.
I hope that across these two episodes, you now have a clear enough picture of how to use it well that you can actually get the full benefit from it. Get the most out of it, y’all. It is so important.
And if you are not using it at all today, then I would say look into it, especially if you are someone who is early post-op. If you are someone who is first week post-op ACL and you are not using any type of electrical stim, that needs to change. There are very few cases where that is not the case.
We are trying to get those quads awake. We are trying to get them to join the party. And especially for those of you with quad tendon grafts, I am very sure this needs to be on your radar because it takes even longer for those quads to come back. Make sure you are putting this into play.
And if you are already using it, go back through the list, find one or two things to tighten up, make those changes and see if it improves. I had one of our team members share that some of our athletes changed a couple of things after listening to this and realized they were missing small details—and suddenly they were getting more out of it.
These small adjustments matter more than people think, especially when we are not checking every single device and every single session in real time. These details can slip.
So tighten it up. Put it into play.
All the device recommendations, links, and research references from both episodes are in the show notes.
And if you need help—if you are thinking, “My PT never mentioned NMES, and I am post-op ACL and I feel like I missed something”—it is okay to ask questions. That is part of good rehab.
We are here to help if you need guidance. Our info is in the show notes at theaclathlete.
Thank you for being here for both parts of this series.
Now go shock your quads. Get after it. Get those things freakishly strong and big.
Until next time, this is your host, Ravi Patel, signing off.
Subscribe and leave The ACL Podcast a review – this helps us spread the word and continue to reach more ACLers, healthcare professionals, and more. The goal is to redefine ACL rehab and elevate the standard of care.
Resources:
- Check out our free ebooks on our Resources page
- Sign up for The ACL Athlete – VALUE Newsletter – an exclusive newsletter packed with value – ACL advice, go-to exercises, ACL research reviews, athlete wins, frameworks we use, mindset coaching, blog articles, podcast episodes, and pre-launch access to some exciting projects we have lined up
- 1-on-1 Remote ACL Coaching – Objective testing. An individualized game plan. Endless support and guidance. From anywhere in the world.
- More podcasts? Check out our archives
Connect: